Photolemur 3 is a fully automatic, drag-and-drop, AI-powered photo editing application. Released by Skylum in 2018, it was available for Windows and macOS as a one-time, subscription-free purchase.
Update 2022: Photolemur is now part of Luminar Neo.
Photolemur 3 Review
Name: Photolemur 3
Description: Photolemur is an easy-to-use photo editing app. It transforms you picture by the click of a button. Photolemur is owned by Skylum, the creators of Luminar and Aurora HDR.
Offer price: 39.99
Currency: USD
Operating System: Windows, Mac
Application Category: Multimedia
Author: Skylum
-
Ease of Use
-
Speed
-
Functionality
-
Presets & Filters
-
Export & Sharing Features
-
Price
Summary
Photolemur 3 is a fully automatic, AI-powered photo editor. The latest versions adds Batch editing and Face Enhancement features. It is a great option for quick, hassle-free image processing.
This particular photo editing application seems to be designed for casual photographers who don’t have the required knowledge for making custom photo edits.
However, thanks to its RAW image format support and batch processing features, it can also be a useful tool for professional photographers who don’t always have the time to manually edit every photo.
When you buy through links on our site, we may earn a commission at no cost to you. We evaluate products independently. Commissions do not affect our evaluations.
Pros
- Fast and simple image processing
- Batch processing unlimited images
- Extensive image format support, including RAW
- Well-balanced results with correct exposure and white balance
- Face enhancements
- Affordable price
Cons
- Some images lack sharpness
- No Zoom tools
As you’ll see in this Photolemur 3 review, we’re not dealing with a typical photo editing tool. There are many photo apps out there that have tools for automatic image enhancements, but Photolemur claims to be different thanks to its Artificial Intelligence (AI). Skylum hopes the AI in Photolemur 3 will be able to replace the user and make all the smart decisions behind the scene, ultimately producing high-quality photographs without the hassle of manual editing.
During this Photolemur 3 review, we’ll examine the photo editing software both in terms of user experience and image processing quality and see if there’s any intelligence to this AI, or if it’s just a fancy buzzword being used as a marketing gimmick.
About Skylum, Skylum AI Lab and Photolemur
Skylum, formerly known as Macphun, is a company based in Washington, responsible for developing Luminar and Aurora HDR photo editing software. Their products are designed with the aim of making the complex photo editing process more user-friendly.
Luminar and Aurora HDR have already won several awards for the effort, including “Best of the Year“ award from Apple, as well as “Best Imaging Software 2017“ by TIPA.
Skylum acquired Photolemur earlier this year as part of their plan to invest in Artificial Intelligence technologies and cloud-based image processing. For the same reason, they opened a new research and development division within their company, called Skylum AI Lab.
The team behind Skylum AI Lab is being led by Alex Savsunenko, the former CEO of Let’s enhance, a company that works with machine learning. Skylum has outlined several goals it aims to achieve with the new AI Lab division:
- Image upscaling (increasing resolution and quality of low-res images using deep convolutional neural networks)
- Tagging (using advanced image recognition to identify and automatically tag images)
- Segmentation (selective image enhancements based on smart recognition of different image areas)
- Automatic enhancements (applies corrections based on a variety of issues)
Photolemur was founded in 2016. by Alex Tsepko and Dima Sytnik., with Tsepko being the co-founder of Photolemur and CEO of Skylum. Photolemur already had upwards of a hundred thousand users before joining forces with Skylum, though critics have expressed mixed feelings about versions 1 and 2.
The AI in Photolemur 3 utilizes machine learning each time it processes a photo, training its neural network to better understand millions of images being loaded by various users using different cameras.
This intelligent imaging software should be able to recognize the form of photography used and distinguish between different objects in images, including people, faces, buildings, foliage, and mountains, so it can apply to edit appropriately.

What’s New in Photolemur 3?
After joining the Skylum family, Photolemur received several upgrades that made its AI engine even more powerful. The smart photo editor now uses no less than 14 different AI technologies to process each photo.
With the release of Photolemur 3, Skylum has gone a step further and added a cloud-based batch editing functionality. Without the limitation of personal computers, utilizing Skylum’s cloud servers, users can now process an indefinite number of images at a time, with all the work being done by AI.
This is just one of many upgrades Skylum has introduced with the new release. Here is the full list of improvements in Photolemur 3:
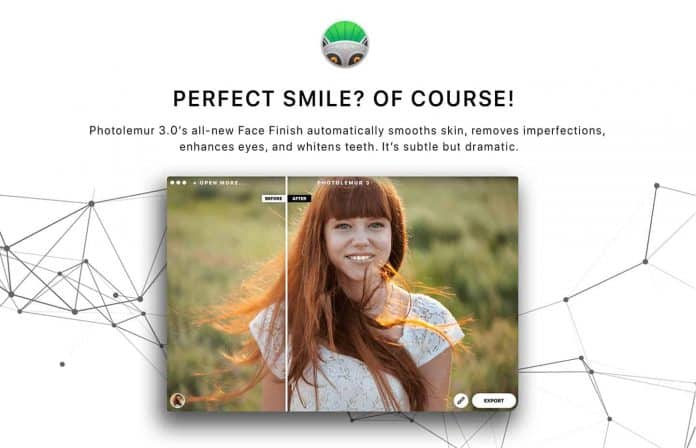
- Automatic face enhancement: Photolemur 3 has a feature to enable automatic face cleanup and enhancement. With a click of a button, the AI will remove face wrinkles, eye circles, whiten teeth and enlarge eyes.
- Photolemur Styles: After the drag-and-drop, the AI will enhance the overall look of your photo. But what about applying different styles? With Photolemur 3 styles, which are similar to Instagram filters, you can do just that.
- Export to SmugMug (Mac): With Photolemur 3 the Export module now has an additional feature of exporting images directly to SmugMug. Mac users will appreciate this.
- Batch processing: It is now possible to apply Boost, Styles and Facial Retouch to a batch of images.
- Performance improvements: Various improvements to speed and stability of the software as well as the AI processing engine.
As you can see, numerous additions to the new version of Photolemur focuses on Portrait photo editing. Combined with the ability to apply these to a batch of images with different styles, this makes Photolemur 3 that much more viable as a useful addition to a professional photography workflow. But can it replace a full-featured application such as Lightroom, Photoshop or Luminar? That’s what we’ll see next in this Photolemur 3 review.
User Experience
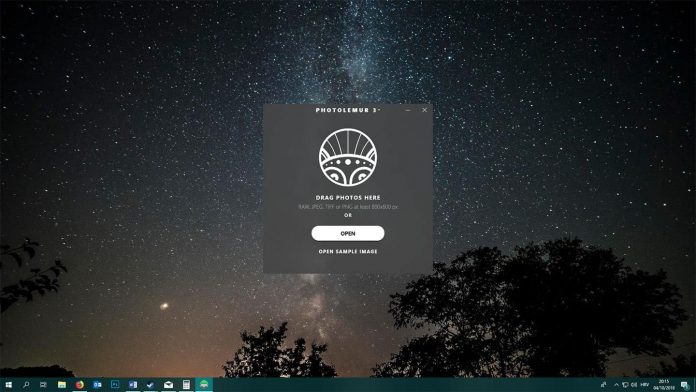
Photolemur 3 is all about simplicity, so you’ll find it has a very minimal interface. After starting the application, you’re presented with a small window with a few options to load photos.
Loading Photos into Photolemur 3
There’s a button for loading a new image using the file browser on your computer. Alternatively, it allows you to simply drag-and-drop photos into the intro screen. Speaking of which, the “intro” screen is windowed, which is fine as it makes it easier to manage when dropping in photos.
Once the photo has been loaded, the interface will expand and accommodate the image aspect ratio, but there’s still no option to go full screen or to zoom in.
I do like the drag & drop gesture functionality. It’s a simple approach that works equally well whether you’re loading a single photo or a batch of images. It’s also something that’s missing from Luminar, for example.
If you’re just testing out Photolemur 3 and don’t have a particular photo you’d want to process at hand, there’s also an option to “Open Sample Image”. Photolemur 3 supports RAW, JPEG, TIFF and PNG photos with a minimum size of 800x600px.
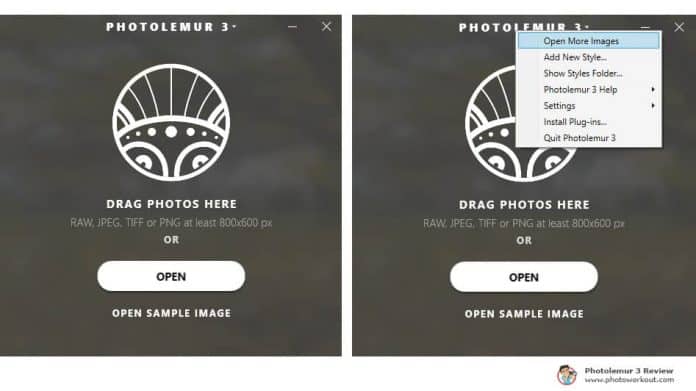
Photolemur has its “main menu” hidden at the top. If you click the “Photolemur 3” title you’ll see a drop-down menu appear.
Photolemur 3 Review: Processing Photos
Photolemur 3 comes with a very limited set of options for processing photos. Once you load an image, the AI engine will immediately start doing its magic, and after a few seconds, present you with the final edit.
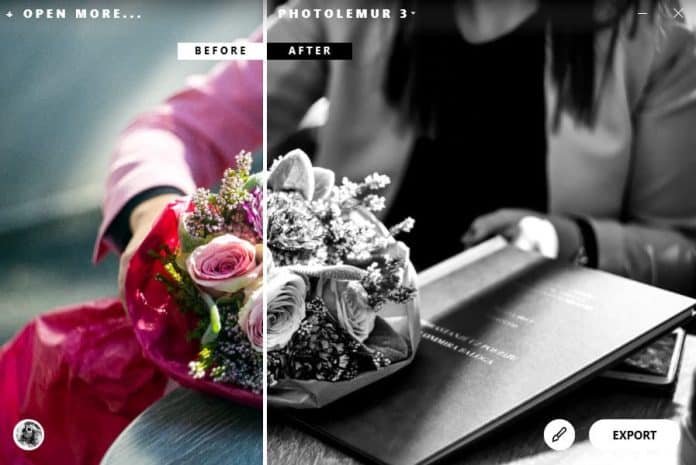
At this point, you’ll see a vertical “Before/After” slider which you can drag around and examine the result in a side-by-side comparison view against the original image. Everything is smooth so far and again, I like the simplicity of this approach.
If you’re happy with the results, you can click the bottom-right “Export” button and you’re done. Otherwise, you can click the Brush icon, sitting to the left of the Export button, to use a slider and adjust the intensity of the processed effect. Drag it all the way to the left for the original image, or anywhere in-between, to achieve the desired result.
Expanding the Brush icon, you’ll see two new options left of the slider, that are among the new Photolemur 3 features: Eye enlargement and Face enhancement. You can turn these on or off by clicking on the respective icon.
Another new addition to Photolemur 3 is Styles. These are Instagram-like Filters that you can apply to your photos after the original AI enhancement has done its work. To see the styles, simply click the circular button on the bottom left. Applying a style will take a few moments, as the application seems to re-run the AI algorithms every time you select a different style. We’ll test both Face enhancements and Styles and examine these features in detail later down the Photolemur 3 Review.
Photolemur has its “main menu” hidden at the top. If you click the “Photolemur 3” title, you’ll see a drop-down menu appear with several options:
- Start Over
- Load more images
- Add new styles…
- Show the styles folder…
- Photolemur 3 Help
- Settings
- Install Plug-Ins…
- Quit Photolemur 3
Related article: Best Desktops for Photo Editing
Photolemur 3 Batch Processing
One of the new features of Photolemur 3 is batch image processing. It’s one thing to have an automatic photo editor where you process single images separately. That would attract the most casual photographers who occasionally want to enhance their photos without the hassle of manual editing. But with automatic AND batch processing, even the professional photographer might find a use for Photolemur 3.
Personally, for any serious photography work, I’ll still rely on photo editing software that allows for more control. However, I also have terabytes of unused and unprocessed raw images laying around my hard drive, some of which could be good images, but I just didn’t have the time to process them properly. These aren’t professional photos in a sense that I’ve done paid work for a client, but are photos from vacations, family gatherings and other personal events, as well as images from when I simply went to shoot street, landscapes or portraits either for practice or simply artistic expression.
If I had them as processed JPEGs instead of RAWs, I’d probably share some of them. That’s where Photolemur 3 can be useful. It allows you to import and automatically process an unlimited number of photos, without having to worry about white balance or lens correction for a particular photo session, as it will apply smart processing for each image individually.
The simplicity of it is the best part. You can just drag and drop entire folders of raw files and a few minutes later have a collection of processed JPEGs ready for sharing.
Applying a specific Style, Boost and Other Settings to a Batch of Images
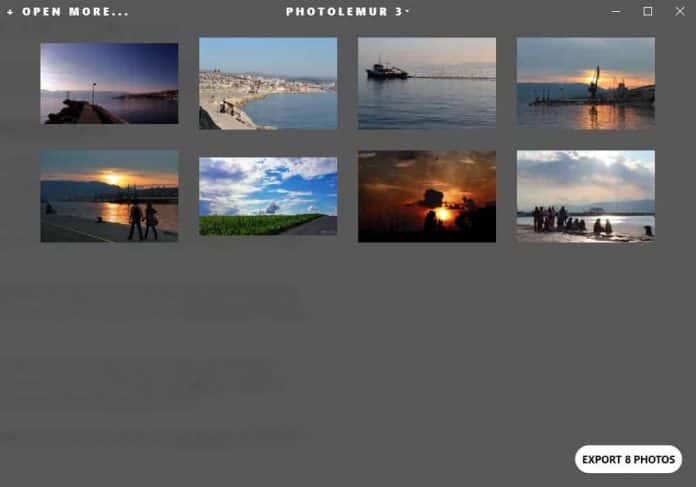
Once you import the batch of photos you want to process you’ll see a gallery of thumbnails for each image. At this point, you can double-click any image and adjust the settings and sliders for any image individually. Once you adjust an image, you can just go ahead and exit it to get back to the gallery view, and Photolemur will remember your changes.
More importantly, however, when you’re inside the single image view, adjusting settings, you can right-click anywhere and select “Apply these settings to all images”.
To be honest, it took me a while to figure out this simple process, as it’s not very apparent. I wish there was a dedicated interface for creating and saving Presets based on image adjustment settings.
Related article: The Best HDR Software Compared
Photolemur 3 Export Options
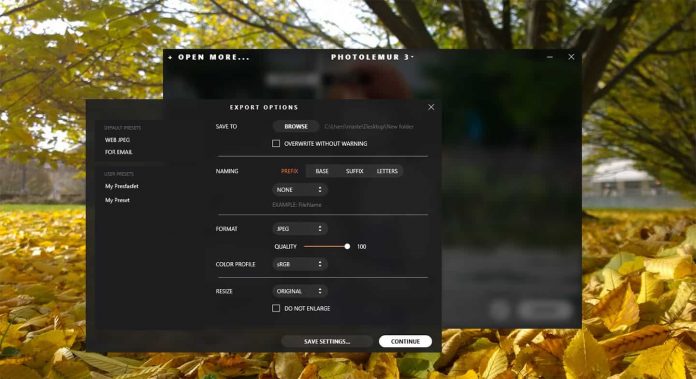
The Export Options in Photolemur 3 review contain the most basic options:
- Save To – Choose the location on your computer where you want to save the file(s)
- Naming – Choose whether you want to name the file as File Name, Custom Text, Counter or Timestamp, and where to put it – in Prefix, Base or Suffix. You can also change the letter to uppercase, lowercase or leave it as is.
- Format – Choose between JPEG, TIFF, PNG, JPEG 2000, Photoshop or PDF.
- Color Profile – RGB, Adobe RGB, Prophoto RGB.
- Resize – You can keep the original dimensions or choose to input custom ones. There’s also an option to cut along the long or short edge – inputting either custom width or height.
Export Presets
There are two default Presets available in the Export dialogue – Web JPEG and Email. The user can also create a new Preset simply by changing any of the default Export options and clicking ‘Save settings…’.
Related Article: On1 Photo Raw Review (Free Trial and 15% Coupon)
Photolemur 3 Review: Performance
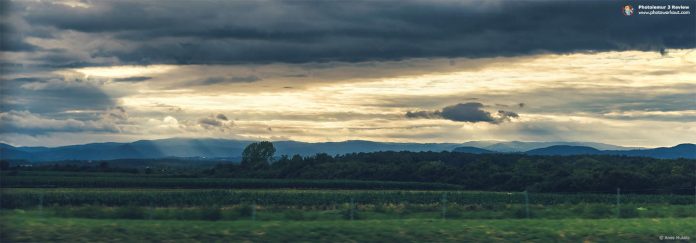
The idea with Photolemur 3 is that it will make all your photo look more pleasing, and that’s generally true. If you feed it an underexposed photo with washed-out colors, it will make it brighter and more vibrant.
Below is a side by side comparison between an unprocessed raw image, Photolemur 3 automatic image enhancement and my own Photoshop edit:
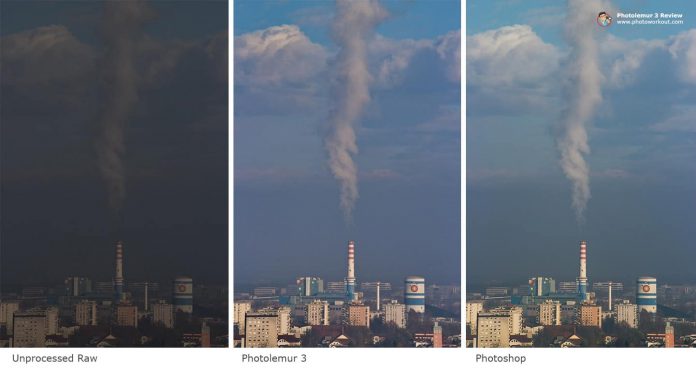
I purposefully chose an underexposed raw image to see how will Photolemur 3 handle exposure compensation. The result is an evenly exposed photo with almost no noise, somewhat colder color grading to that of my own edit, which of course is a matter of personal preference.
I’m quite pleased to see that it properly utilizes the extended dynamic range that comes with RAW photos. You’ll see much more information in a photo after the AI is done boosting shadows and reducing overblown highlights. At the same time, it will bump the contrast proportionately so that the result is an overall richer image that really pops. I also like how it never goes too far, so you won’t see an over-processed HDR look.
I’ve also found it does well with managing the white balance. While it may have a problem with slight over-saturation on some types of images, the white balance temperature value seems to be generally accurate.
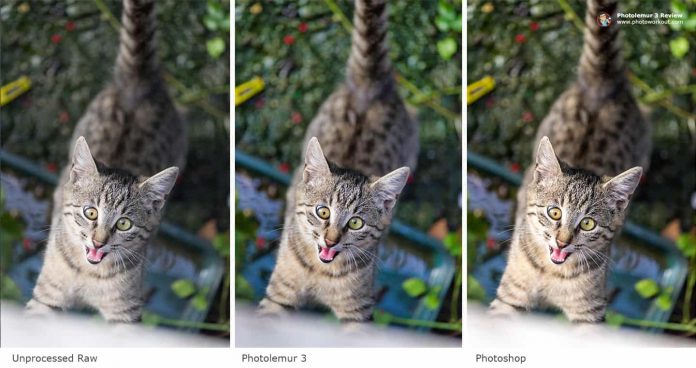
In the comparison below we can see Photolemur 3 version has boosted vibrancy, shadows, and contrast with highlights (see left leg) slightly reduced compared to the original raw photo (left). It may not seem like a big difference at first, but it is a nice, balanced edit. The photo to the right is my own quick edit in Photoshop, with similar results though somewhat warmer than Photolemur’s version.
Noise Reduction and Sharpening
One thing I noticed when comparing photos that come out of Photolemur 3 with my own editing in Photoshop, is that photos from Photolemur consistently show very low to no noise. The AI seems to have rather good noise reduction algorithms, especially because it doesn’t show any artifacts despite processing. Do note that I’ve been testing this primarily with RAW files, and processing JPEGs will likely produce lesser results. This is, however, a sword with two blades, as images processed with Photolemur 3 seem to come out rather soft, i.e. lack sharpness in detail. You won’t notice this when looking at a photo inside the app since there’s no zooming option.
Related Posts
Lens Correction
Photolemur 3 does have built-in lens correction, which, just like everything else in this photo editing application is completely automatic. You can, however, turn it on or off. While it does a decent job of removing chromatic aberrations and vignetting, it can drastically reduce the quality of your photo because of its aggressive image transformation.
Photolemur 3 Review: Face Enhancement and Eye Enlargement
One of the most anticipated new features in Photolemur 3 is Face enhancement. It can be toggled on or off, with ‘Eye enlargement’ having a separate toggle button.
Before we see how it works, let me explain why this feature is welcomed. Portrait photographers know best how much work and fine adjustments are required for the face “touch up”. Things like manually removing blemishes and pores, correcting skin tones, whitening teeth and generally “prettying up” faces in portrait or group photos are quite time-consuming.
Sure, there are Photoshop and Lightroom plugins out there for face enhancement, but that still doesn’t come close to the simplicity of Photolemur 3. Having an AI do this automatically for a large batch of photos would be life-saving. That is if it lives up to the hype and actually delivers good and not (too) unrealistic results.
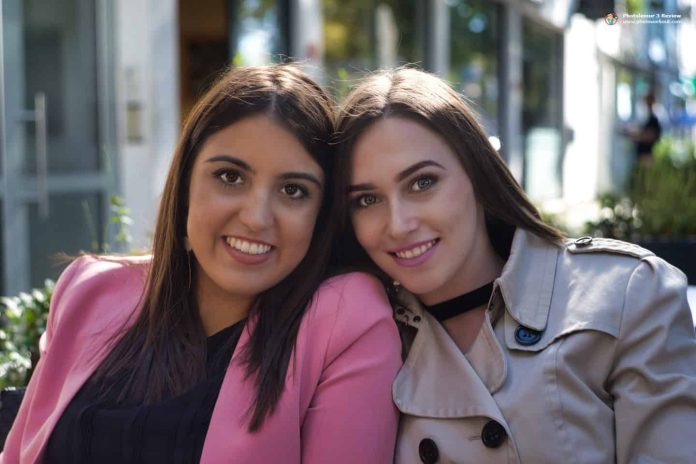
To see Photolemur 3 face enhancement in action, I asked my friends for a group portrait photo when we were out for coffee. Here is the original photo, unedited JPEG directly from the camera:

And here is the same photo after it went through Photolemur 3 automatic image processing, with Face enhancement and Eye enlargement settings enabled:
Related article: Best Laptops for Photo Editing
Styles (Filters) in Photolemur 3
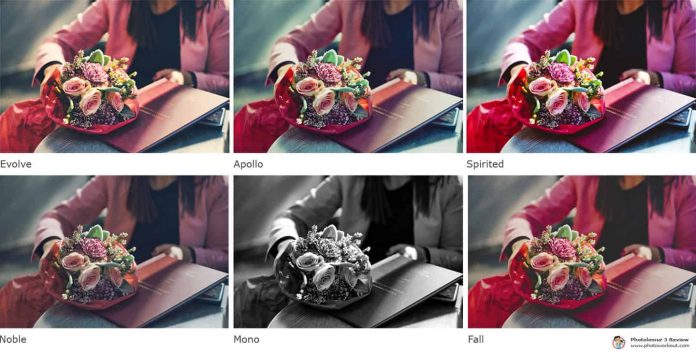
As we’ve seen through this Photolemur 3 review, there is a bit more to this automatic photo editor than it meets the eye, and to top that we now have Photolemur Styles. These Instagram-like Filters add special color grading to your photos and can be applied to photos individually or in a batch.
By default, there only half a dozen of them loaded into the app. Clicking the ‘Add more styles’ button takes you to a web page it basically says “More styles are coming later. Enjoy the free ones for now.” This means we can probably expect “premium” Styles being released for sale in the future, but maybe we’ll see some more freestyles too.
Related Post: Editing Styles in Photography
It’s a bit disappointing there are still only a few styles available, especially when you look how many are available in other apps. I’ve found Styles that are currently available are interesting enough and I’m looking forward to future updates to the Styles palette.
Let’s have a look at how different styles work on this example photo:
Photolemur 3 Review: Loading Speed and Resource Usage
Performance during the course of this Photolemur 3 review has been largely consistent, although not particularly fast.
It takes 5-10 seconds to process a single raw image, and 1-2 seconds for a 5mb JPEG image. That would be fine, except it takes as much as time to apply any setting change, such as turning on and off face enhancement or lens correction. The same goes for switching between styles. So, if you’re editing a heavy raw image, just clicking the five different Styles take up to a minute. It would be nice to have thumbnail photo preview for each Style, so that you at least have an idea of what your photo will look with a particular Style, instead of just static icons.
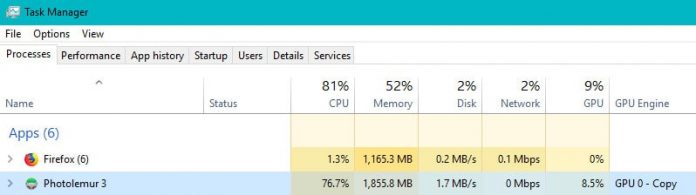
It takes about 3 – 3.5 minutes to process 20 raw files. Each around 10mb. During the process, Photolemur 3 RAM usage was in the range of 1-2.5 GB, while it used anywhere between 60-80% of CPU. That’s on an Intel i7 Windows 10 system.
Photolemur 3 Review: Conclusion
On one hand, we had Photolemur, software that promises “great photos automatically” by utilizing AI image processing technology. Photolemur versions 1 and 2 showed relative success by selling a six-figure in terms of the number of copies, while reviewers responded with mixed feelings about the software, saying the processing engine is still ‘immature’.
But then came Skylum, acquiring Photolemur and opening the Skylum AI Lab around the same time, and we got Photolemur 3. The latest version of this automatic photo editing software shows a lot of improvements and a range of new goodies. Among these features are batch image processing, automatic face enhancement and upgrades to speed and stability.
The Quality of AI Image Processing
I’ve found the quality of AI editing and processing in Photolemur 3 to be generally good. I don’t know about artificial intelligence but the software seems to be smart enough, adding just enough vibrancy and contrast to images to make them more pleasing, but not going over the edge.
If the highlights are too blown out, it will try to reduce them, same with shadows if they are too dark. It works even better with raw images instead of JPEG. My only real complaint when it comes to general processing is the lack of sharpness in photos. Sure, it does great reducing noise, but some images come out really soft as a result.
Face enhancement and Eye enlargement are welcome features, proving very useful for portrait and group photography. That is when they work. I feel like the face-correction tech needs some more work from Skylum, as it currently isn’t completely reliable.
With so many photo editing applications out there, with each adding more and more advanced editing tools, it can be an overwhelming experience choosing the best one. In the midst of them all, Skylum releases Photolemur 3 as a fully automatic photo editor, which takes away control from the user and leaves all the work to artificial intelligence. As such, it is a sensible choice for all the non-tech-savvy photographers out there who are not comfortable with spending hours in post-processing.
Related article: Topaz Photo AI Review
Just for Amateurs or for Professionals Too?
With the addition of Batch image processing and Face enhancement features in Photolemur 3, it might have become an interesting choice for professionals as well. With that said, I personally wouldn’t bet on Photolemur to do my post-process job when it comes to, say, fine art photography for print.
However, as any long-time photographer knows, be it an enthusiast or a professional, we have thousands of unused, unprocessed photos laying around on an HDD or in the cloud. Things like photo sessions from family gatherings, vacation photos, or various street, landscape, macro or any other types of photos that we never got around to editing, but could use for sharing or in a personal portfolio. Photolemur 3 is perfect for these, as you can just drag & drop and wait for the magic to complete.
Photolemur 3 supports all the standard image file formats, including JPEG, PNG, TIFF and RAW. Even though it’s not listed as supported, it opened ARW files from my Sony camera without a problem.
Can Photolemur replace Photoshop/Lightroom? Of course not. But, for a very affordable price in a one-time purchase of a lifetime license, Photolemur 3 can be a worthy tool for any photographer.
Great review: clear, concise.. really helped. I appreciate the way you worded to appeal to mass audiences and not just professionals. I intend to buy this product to batch-process 1000’s of scanned photo’s I’ve collected over the years. Happy New Year. All the best 🙂