Digital technology has had a tremendous impact on how we process images nowadays. Today, it is possible to stack together images, retouch and process an image in a way it was never even conceivable a decade ago.
Blending images usually means taking two or more photos and merging them together to produce a new one.
There are many reasons why a photographer would want to blend images together. Landscape photographers routinely blend images to produce a greater dynamic range.
Editing Real Estate Photos in LR & PS:
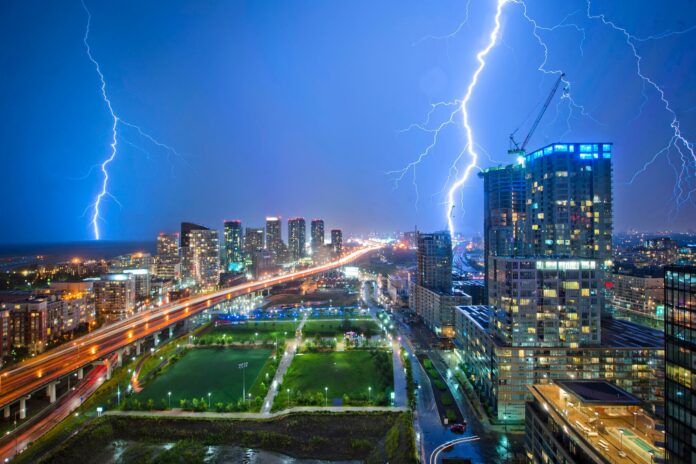
They even use blending to produce effects that are impossible to be created using a single frame. Such as, several lightning strikes across the scene captured over a number of frames.
Or, a misty look to the surf that is produced by blending several images together. Images like these were difficult, if not impossible, to be created without digital technology and or the use of additional tools.
In this article, we shall be looking at the process of stacking images.
Stacking involves piling up several images, one on top of the other, in a digital photo editing tool and then blending them together to create a new image.
Stacking Real Estate Shots
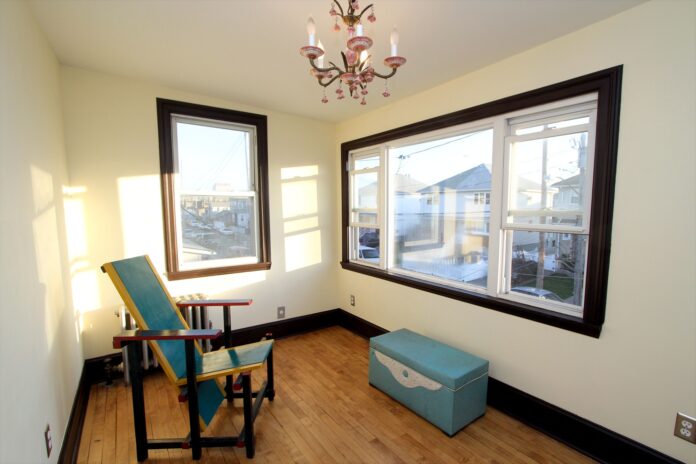
Real estate photography, especially interiors, often grapple with differing light values – luminous exteriors juxtaposed against dim interiors.
Related Posts
Most real estate photos necessitate some form of blending for an enhanced dynamic range. While traditional HDR methods are now more streamlined with plugins in Lightroom and Photoshop, other effective techniques exist.
Taking the Images
Step one is to make the images. Ensure that your camera is set on a tripod and you have selected RAW as the image quality.
Also, ensure that you have selected exposure bracketing, with a reasonable increase / decrease in the exposures between the frames. Auto exposure bracketing automatically adjusts each exposure based on the difference in exposure you have set.
Lastly, set your camera to continuous shooting mode. I would personally use either the auto-timer function or a remote trigger to make the exposures. This removes any possibility of the camera shaking in between shots.
Stacking Images Using Lightroom and Photoshop
- Import and Select Photos: After shooting, import your images into Lightroom. In the Grid view or the Filmstrip in the Library module, select the photos you want to stack. Ensure they’re in the same folder or collection.
- Open as Layers in Photoshop: Choose Photo > Edit in > Open as Layers in Photoshop. Your photos will display order numbers in their thumbnails’ upper left corner, with photo 1 as the top layer and so on.
- Auto-Align Layers: In Photoshop, select the layers in the Layers panel. Then, choose Edit > Auto-Align Layers. Make sure Auto is selected in the Auto-Align Layers dialog before confirming.
- Auto-Blend for Stacking: With all the layers in the group selected, opt for Edit > Auto-Blend Layers. In the subsequent dialog, select Stack Images and confirm. Your focus-stacked image will manifest as a layer mask.
- Return to Lightroom: After saving your final focus-stacked image in Photoshop, it will be automatically imported back into your Lightroom catalog, allowing for further tweaks if needed.
Using LR/Enfuse or the Photomatix Pro Software
The final step is to use a tool named LR/Enfuse. This tool blends all the exposures in the stack and creates a perfectly balanced image with a greater dynamic range than it is possible with a single frame.
Another option is the Photomatix Software by HDR Soft, which recently improved their Fusion/Real-Estate method (version 5.1 upwards). This method is designed for interior scenes with a view out of the window and is now called Fusion/Interior, and it includes a new brightness setting.
You can download a free trial or upgrade your version of Photomatix and try it for yourself.
Both the LR/Enfuse and the Photomatix option work without having to leave Lightroom, and the stacked photos can be saved right into the Lightroom image folder you are working on.
The New Lightroom Merge Functionality
While Adobe Lightroom now boasts built-in “Photo Merge” functionality, one must discern if external plugins or software are still pertinent for real estate image stacking.
For interiors with intricate HDR architecture, Photomatix Pro remains a formidable option.
Commence your stacking endeavors with Lightroom’s built-in Merge feature. If the results don’t satiate your requirements, consider exploring the LR/Enfuse plugin or the Photomatix Pro solution.
Recommended Videos
Interior Property Photography
How to mix the ambient light outside the window with flash or studio light inside the property when photographing interiors.
Realistic HDR Interior using Lightroom
A tutorial about how to make realistic HDR images of interiors using Lightroom 6/Lightroom CC.
I get this error message when trying to run Enfuse in Lightroom CC 2021 on a Mac: “Error running exiftool More information is in the file LREnfuse_log.txt on your desktop”. I’ve read of other Mac users that have reported this problem in earlier Lightroom versions on their Macs. Are you aware of this, and if there’s a solution?
Hey Buddy,
just tested Enfuse in Adobe Lightroom Classic on a Mac (M1) Laptop and it works fine. There were some other apps needed (‘enfuse’ and ‘align_image_stack’ from Hugin project. This was done automatically. See screenshot: https://www.screencast.com/t/DXrMcNGEr2
Also, maybe this forum can help: https://exiftool.org/forum/index.php?topic=11201.0
I’m still running a stand alone version of LR 6.14 on MacOS 10.12.6 I suspect that version will not run on the M1 Mac Mini – so I’ll have to get a subscription for Lightroom Classic CC, and d/l a newer version of Enfuse correct?