Wide-angle lenses are an incredibly effective way to draw in the viewer and create breathtaking photos; it’s why they’re a favorite of landscape photographers, cityscape snappers, architectural shooters, and more.
However, handling that expansive field of view can be challenging, especially if you’re used to a tighter perspective. I love shooting with a wider lens, and in this article, I share my top tips, tricks, and secrets for stunning results when working in that wonderful 12-40mm range. Whether you’re a beginner or an experienced snapper, you’re bound to learn a technique or two to improve your images!
Wide-Angle Lens Photography Tips:
1. Use Leading Lines to Draw the Viewer into the Scene
Wide-angle lenses are uniquely powerful because they give an expansive field of view that makes people feel like they’re in the scene. It’s already a nice effect, but if you want to accentuate it further, you should use leading lines.
Leading lines refer to lines that lead the viewer throughout the scene. They often start at the bottom of the frame, then lead the viewer toward the background:
Now, you can find leading lines pretty much everywhere you go. Common leading lines include roads, bridges, rivers, and fallen logs. And they’re a fantastic way of pulling your viewer straight into the shot. When combined with a wide-angle lens, they’re unstoppable!
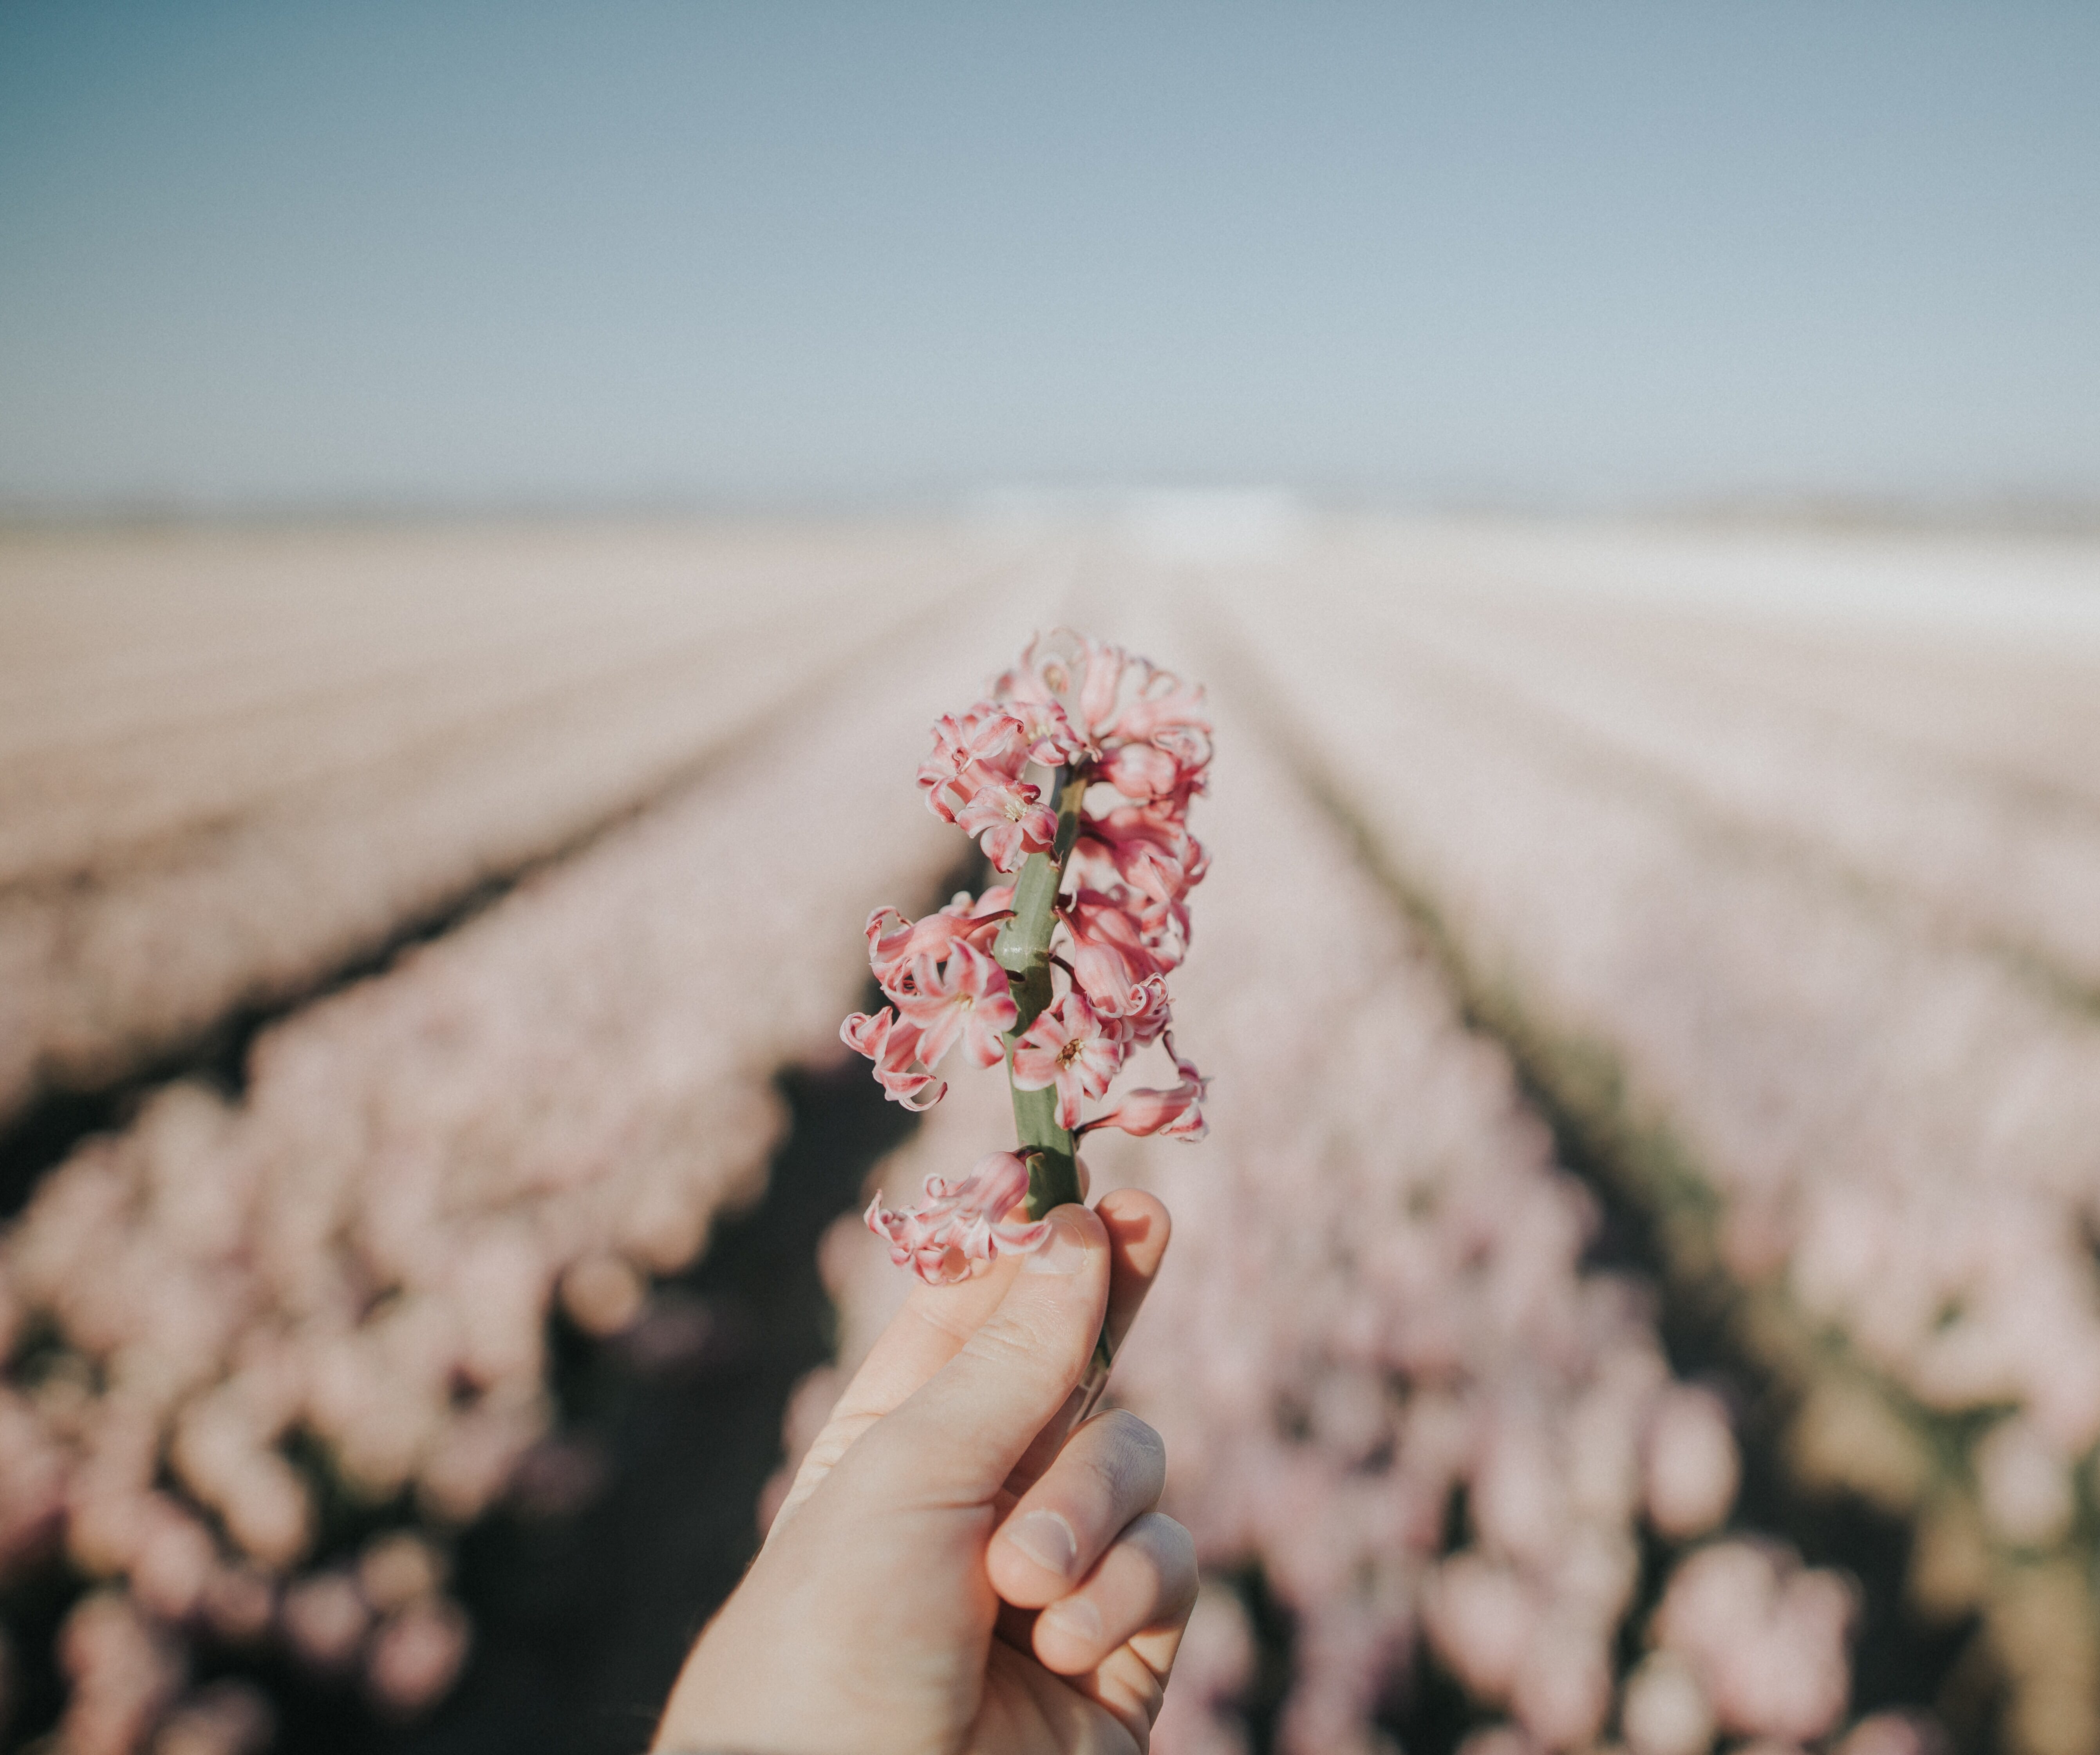
2. Use a Near-Far Composition Technique for Stunning Landscapes
Photography is a two-dimensional medium, but the best photos are often those that can create depth – the type of image that makes a scene feel three-dimensional, not two-dimensional.
Now, telephoto lenses are pretty bad at creating scenes with depth. But wide-angle lenses let you create a gorgeous depth effect – if you know what to do.
See, near-far composition is a technique that landscape photographers use all the time to create depth in their photos. Here’s how it works:
First, find a background that you like (such as a stunning sky, a mountain, or a forest). Then hunt around until you find a stunning (and complementary) foreground element, such as a rock, some flowers, or some grass.
By positioning the foreground element low in the frame and the background high in the frame, you’ll create a tremendous amount of depth. The foreground element will feel like you can touch it, and the background element will feel far in the distance.
3. Shoot a Panorama to Capture Everything
Wide-angle photography often involves photographing vast, sweeping scenes. But sometimes even the widest lenses don’t offer quite enough space. That’s where panorama techniques come in handy.

Simply put your camera on a tripod. (If possible, mount it vertically.) Then take several shots as you gradually rotate your camera’s position. Make sure you maintain the same camera settings as you adjust your camera. And make sure you include a significant overlap between shots.
Once you’re done, you can take your images and import them into a panorama stitching program. And you can combine them for one stunning, ultra-wide shot!
4. Go Minimalist for a Beautifully Empty Shot
While wide-angle photography often involves packing everything in a single frame, sometimes it’s better to include as little as possible. I’m talking about photographic minimalism, which is a compositional approach that relies heavily on negative space:

As you can see in the example above, minimalist photography includes very little actual detail. The compositions are filled with emptiness. And by including all this negative space, the main subject – the positive space in the image – looks especially powerful.
Now, you can create minimalist compositions with any type of lens. But a wide-angle lens can give you a very unique perspective because it’ll minimize distant objects and make them seem farther away. Plus, it’ll allow you to include plenty of negative space around nearby subjects (e.g., a tree against the sky). That way, you can point your lens at a single element on the horizon, keep plenty of sky in the shot, and fire away!
5. Juxtapose Foreground and Background Elements for Interesting Contrast
If you want to create complex photos that make the viewer really think, then I highly recommend you work on your juxtaposition – where you include at least one clear foreground element and one clear background element that play off one another, like this:
Juxtaposition is a powerful photographic technique, and you can contrast plenty of different subjects. For instance, you might contrast colors (blue and yellow), tones (light and dark), or content (a person looking sad with a happy billboard in the background).
These shots are tough to get because they require an ultra-broad field of view. Fortunately, with a decently wide lens, you can shoot juxtaposition-type compositions all day.
And note that you can use this technique in all sorts of genres. For instance, you can juxtapose foreground structures with background buildings in architectural photography. You can juxtapose foreground dirt with background trees in landscape photography. And you can juxtapose people with buildings in street photography.
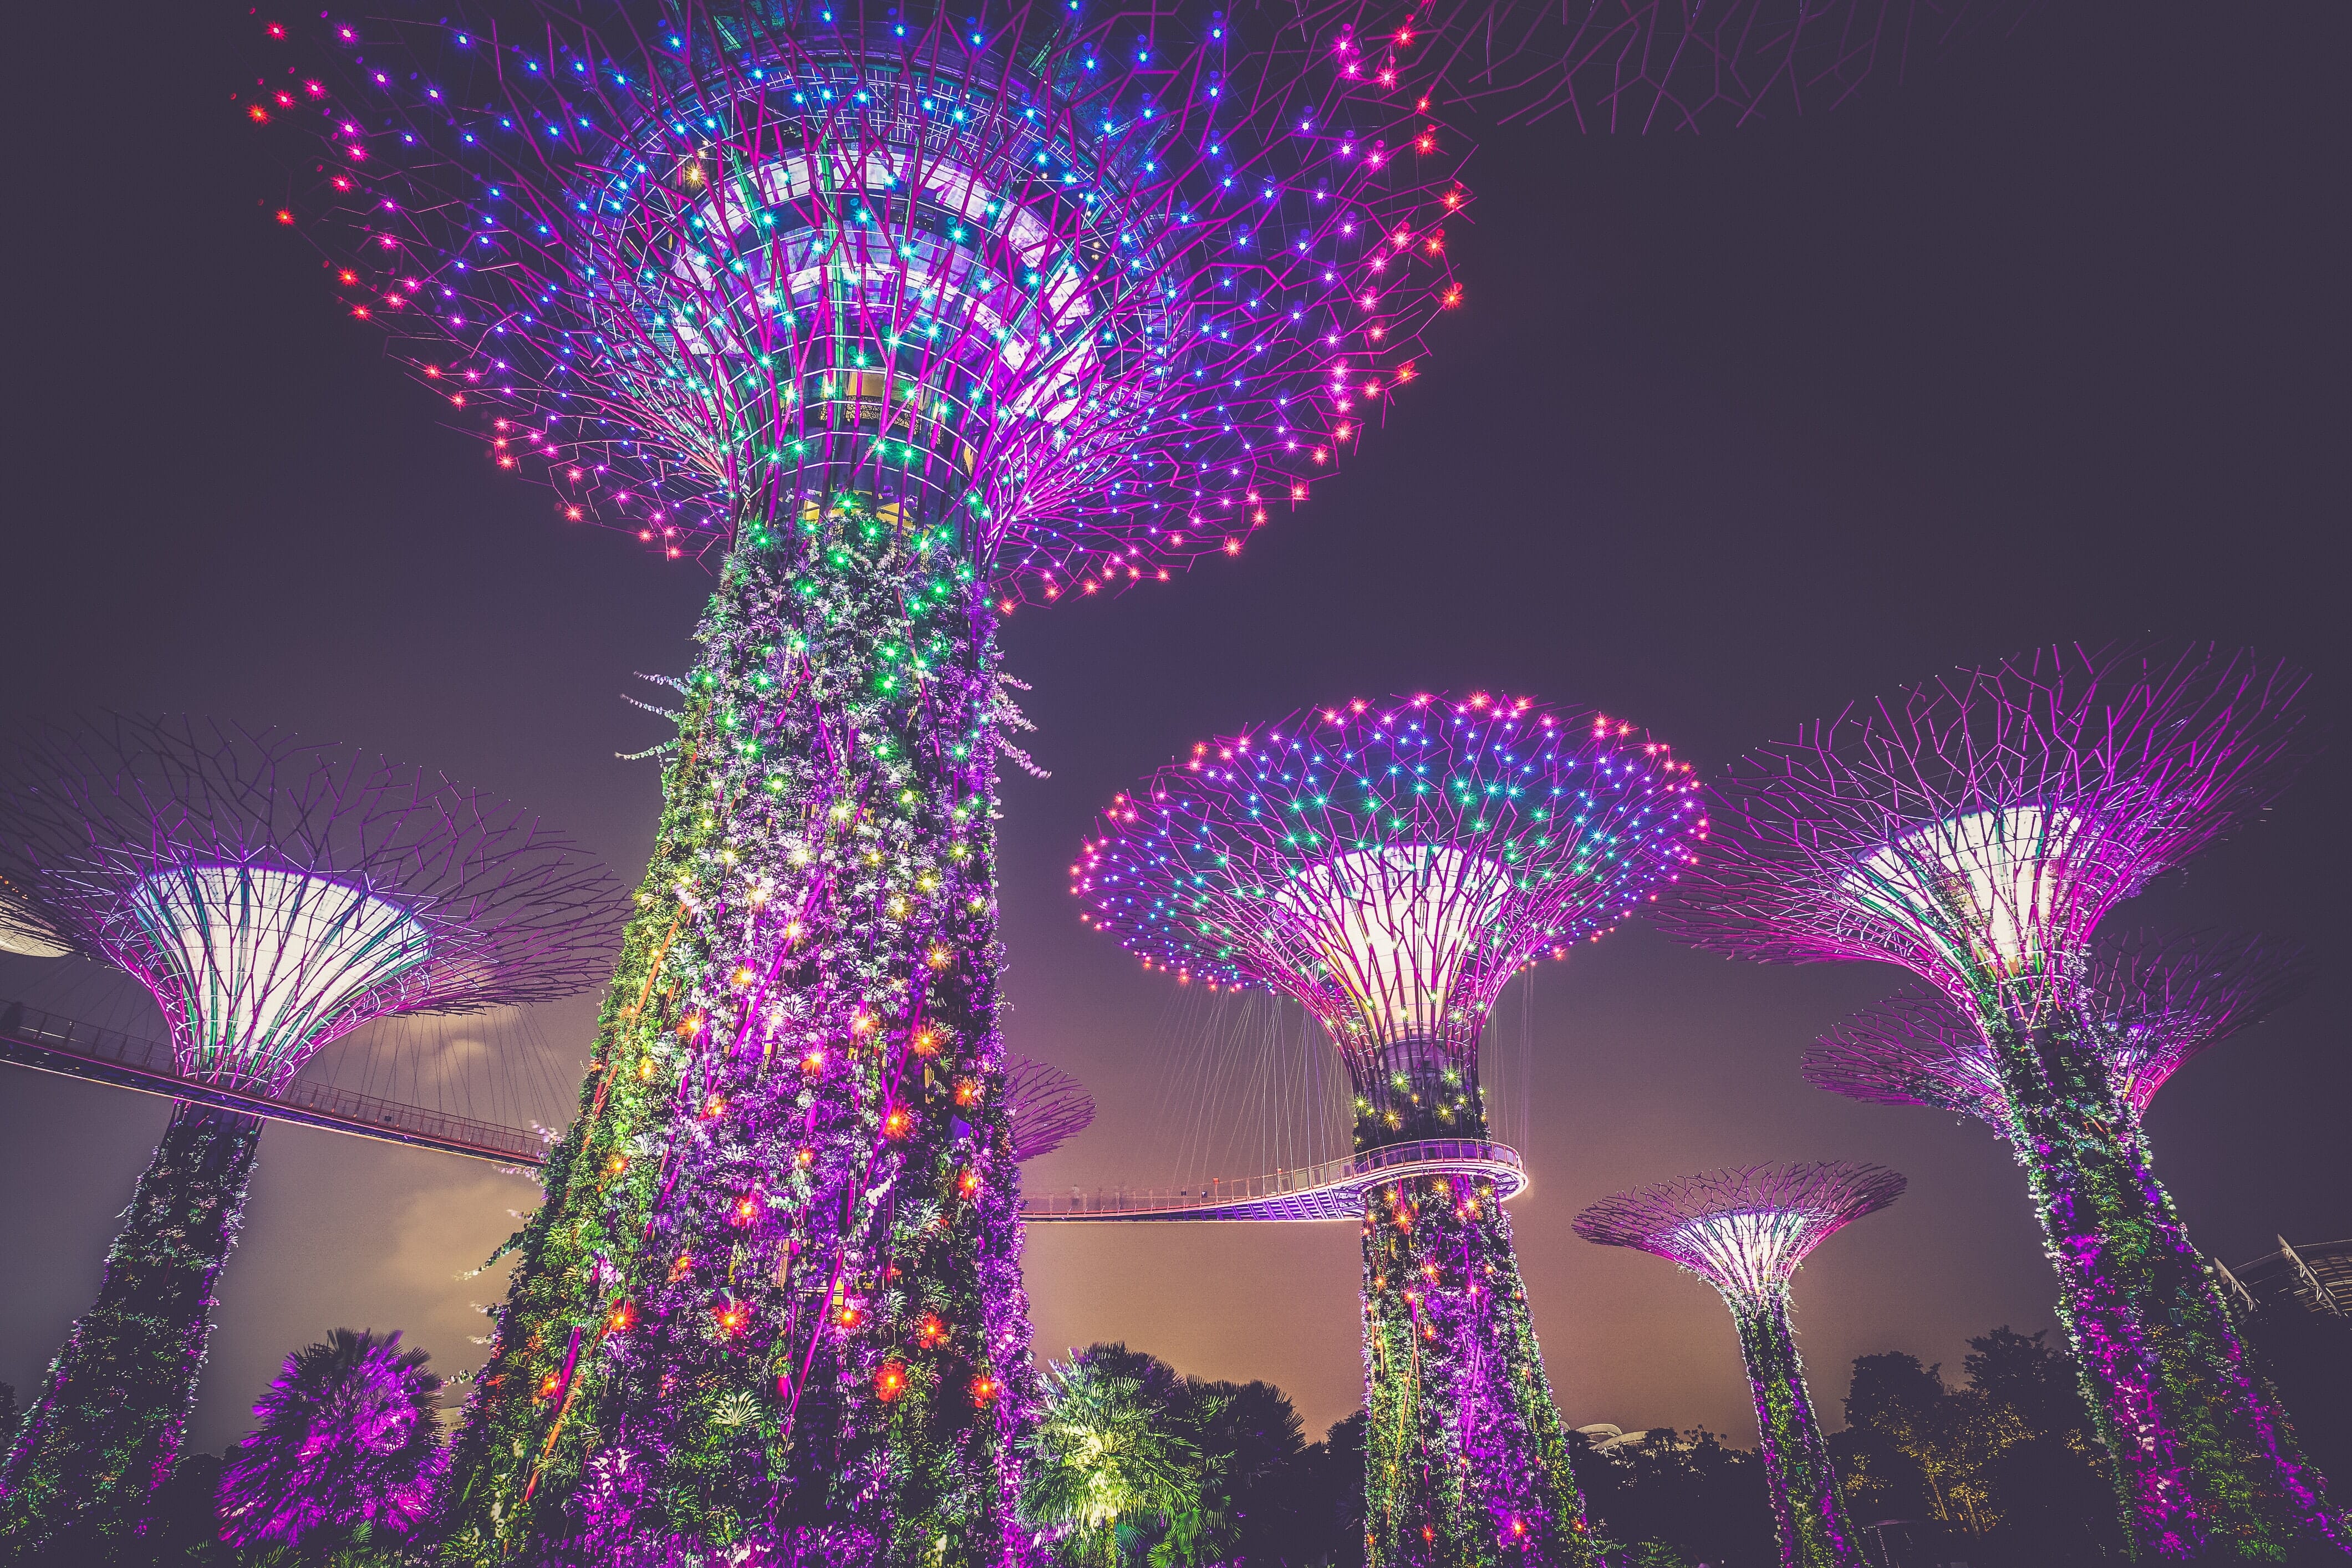
6. Shoot Buildings from Below for a Classic City Shot
Here’s a quick wide-angle photography tip that you’ll love, especially if you frequently shoot in interesting cities: Simply find a few tall buildings that sit side by side, zoom out your lens to its widest setting, and shoot upward! You’ll end up with a result like the one below, where the buildings seem to fall inward thanks to perspective distortion.
Plus, you can use long exposures to create wispy, stretchy clouds above the buildings, or you can use the buildings to create an interesting frame within a frame around the sky.
Note that you will need relatively tall buildings for this tip, so you’ll want to shoot in a big city with genuine skyscrapers.
Another piece of advice: Try this tip in all sorts of weather. You see, you can get ultra-powerful photos in rain, snow, or fog (and shooting upward toward the tops of foggy buildings is incredibly fun!).
7. Shoot in Cramped Surroundings to Create Volume
Wide-angle lenses let you portray an entire scene without any cropping, which is a fact you can use for unique results.
First, find a cramped area, such as the corner of a room. Make sure the surroundings really open up – the way a door frame opens into a vaulted church or an overhang opens into a stunning landscape.
Then incorporate the nearby surroundings into the frame so you get a shot that leads out from the cramped area and into the space. It will create a very unique perspective, like this:
Also, don’t be afraid to incorporate lots of foreground. As you now know, a foreground subject enhances depth and also adds interest, especially when it’s carefully juxtaposed with the background.
8. Use a Narrow Aperture to Keep Everything in Focus
A lens’s aperture is a diaphragm that opens and closes. And by closing down the aperture – that is, by narrowing it – you can increase the amount of the scene that’s in focus (known as the depth of field).
With a narrow aperture, you can create a shot like this one, which is sharp from front to back:
And with a wide aperture, you’ll create a shot like this one, which is only sharp right around the main subject:
If you want a shot that’s sharp from the nearest foreground element to the most distant background element, then you must pay close attention to your aperture settings. In general, if your scene has a near foreground element, you’ll want to use an aperture of at least f/11 to keep the entire shot sharp. And in some cases you’ll need to go further than this, narrowing the aperture to f/13 or even f/16. (In cases where f/16 isn’t enough, you can always use a focus-stacking technique to take several photos and blend them together later in post-processing.)
If you’re confused by all these aperture numbers, don’t worry; just know that higher numbers correspond to narrower apertures. So a number such as f/16 will give you an especially deep depth of field, whereas a number such as f/2.8 will give you a very shallow depth of field.
When you’re out shooting and you want your scene sharp throughout, I recommend shooting at f/8 or so before previewing the shot on your camera’s LCD. Note the sharpness at the extreme ends – both in the foreground and in the background. How does the shot look?
If the entire image is sharp, that’s great, and you’re done! But if not, you can increase the aperture number to f/11, try again, and review that shot. After a few rounds of this, you’ll hopefully end up with an acceptably sharp shot!
9. Get Down Low for a Shocking Foreground
Wide-angle lenses make the foreground prominent and the background recede. So if you want to create a very cool look, you can always get down low! It’ll cause the foreground to loom large in your shot, like this:
The effect will really hit the viewer hard, plus it’ll offer a unique perspective. Also nice about the low perspective is the way it makes the viewer feel like they’re looking up at something. You can make natural features (such as trees) seem huge. And even dogs can seem big when photographed from below with a wide-angle lens!
Really, I recommend trying out a low perspective whenever you get the chance. Assuming there’s an interesting foreground element, you’ll often come away with a unique shot, one that has the potential to make your viewers’ jaws drop.
Do make sure your aperture is narrow enough, though – as I explained in the previous tip, if you don’t use a narrow aperture, you’ll struggle to keep the shot sharp. And with a low perspective and a prominent foreground element, keeping the aperture stopped down is critical.
10. Point Your Lens Down Long Corridors for a “Tunnel” Shot
This is another classic shot and one that everyone should try for themselves. It’s dead easy, too; you just have to find an area with long corridors. This could be a tunnel, a row of shops, a stretch of buildings, or a long hall.
Related Posts
Then stand at the start of the corridor, and point your camera down it. If your lens is sufficiently wide, you’ll capture some stunning converging lines, as the corridor walls come to a point at the end of the scene, like this:
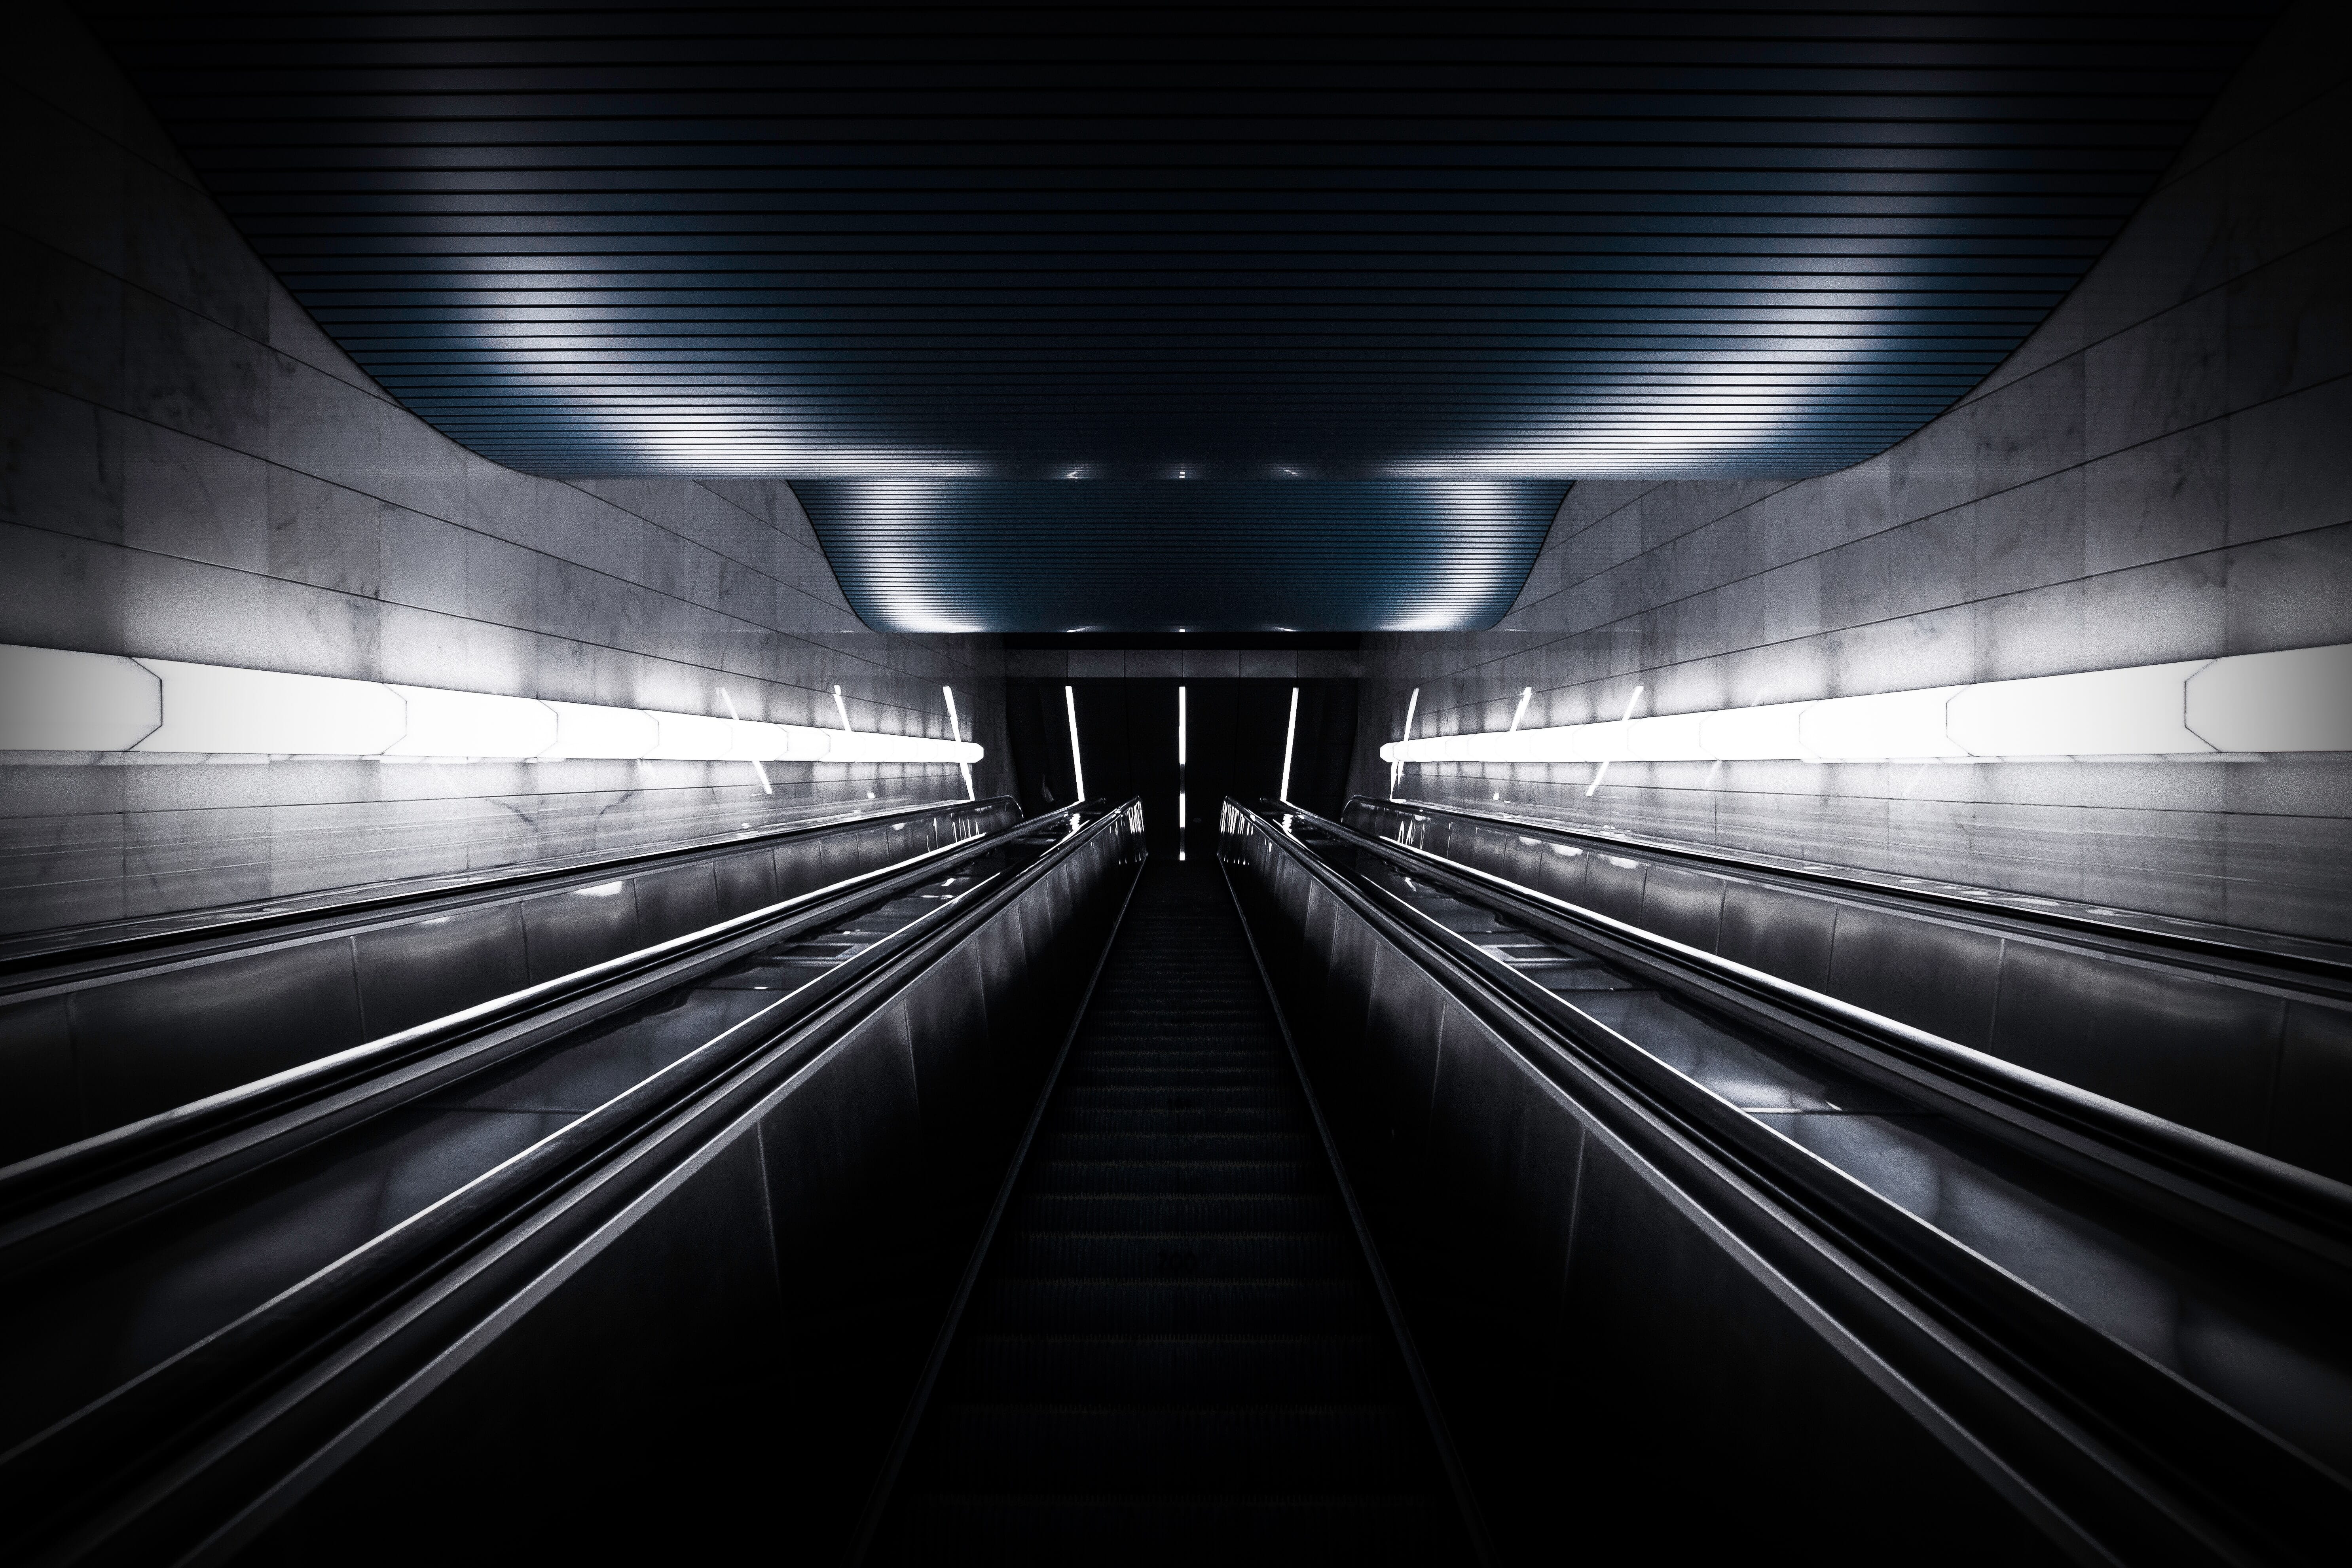
It’s another fantastic way to create depth, and if you can incorporate some foreground elements, that’ll be a nice bonus! For instance, you could have a person walking through at the beginning of the corridor. Or you could get down low and use the floor as foreground interest. Just be creative, and don’t be afraid to experiment!
11. Layer Your Scenes for Intricate Compositions
I’m obsessed with layered compositions because they have this level of intricacy and complexity that’s hard to find in photography. Layering doesn’t have to be especially complicated. But when done well, it can be jaw-droppingly gorgeous.
I’ve already discussed certain layering techniques and principles throughout this article. For instance, you can layer with strong foreground elements. And you can layer with juxtaposition.
But the basic idea is even simpler: You just make sure your photo has a foreground, a middle ground, and a background. As long as you include those three areas, your shot will look great.
The foreground will draw the viewer into the scene. The middle ground will guide the viewer along. And the background will serve as a resting point, where the viewer’s eyes can land and really appreciate the entire composition.
I’ll be the first to admit that finding layers can be tough, especially if your eye isn’t trained. But over time, you’ll get better at it. I’d recommend starting by searching for a strong background and only then searching for a nice foreground and middle ground. You can also try searching for interesting foreground elements, then considering possible middle grounds and backgrounds.
Enjoy Your Wide-Angle Lens Photography!
A wide-angle lens is a great way to produce dramatic shots that are full of depth. By using the settings and composition techniques I’ve shared above, you can produce amazing landscapes, cityscapes, architectural shots, and so much more.
So grab your wide-angle lens. Remember the tips in this article. And go shoot!
What is a good reference book for wide angle lenses ? Particular the 10 – 18 mm range.